
How to Resize an Image: Change Dimensions Without Ruining Quality
Resizing an image changes its pixel dimensions — making it larger or smaller to fit a specific use case. Whether you need a profile photo at a specific size, a product image that fits your website's layout, or a file small enough to email, resizing is one of the most common image tasks. Done correctly it's simple; done incorrectly it produces blurry, stretched, or oversized results.
Why Resize an Image?
- Meeting platform requirements — Social media platforms, job applications, and websites often specify exact image dimensions
- Reducing file size for sharing — Smaller dimensions mean smaller file sizes, easier to email and upload
- Fitting a website layout — Images need to match the display size of the space they fill
- Creating thumbnails — Smaller versions of images for previews and galleries
- Print preparation — Sizing images to specific print dimensions
What You Need to Know Before Resizing
Making images smaller always looks good. Making them larger often doesn't. Reducing an image's dimensions removes pixels — the remaining pixels are sufficient to represent the image at the smaller size. Increasing dimensions requires the software to invent new pixels, which produces blurriness. You can always make a large image smaller; you can rarely make a small image larger without quality loss.
Maintain the aspect ratio. The aspect ratio is the proportional relationship between width and height (e.g., 16:9, 4:3, 1:1). Changing one dimension without proportionally changing the other stretches or squishes the image. Always resize with "maintain aspect ratio" or "constrained proportions" enabled unless you specifically need a non-proportional resize.
Example
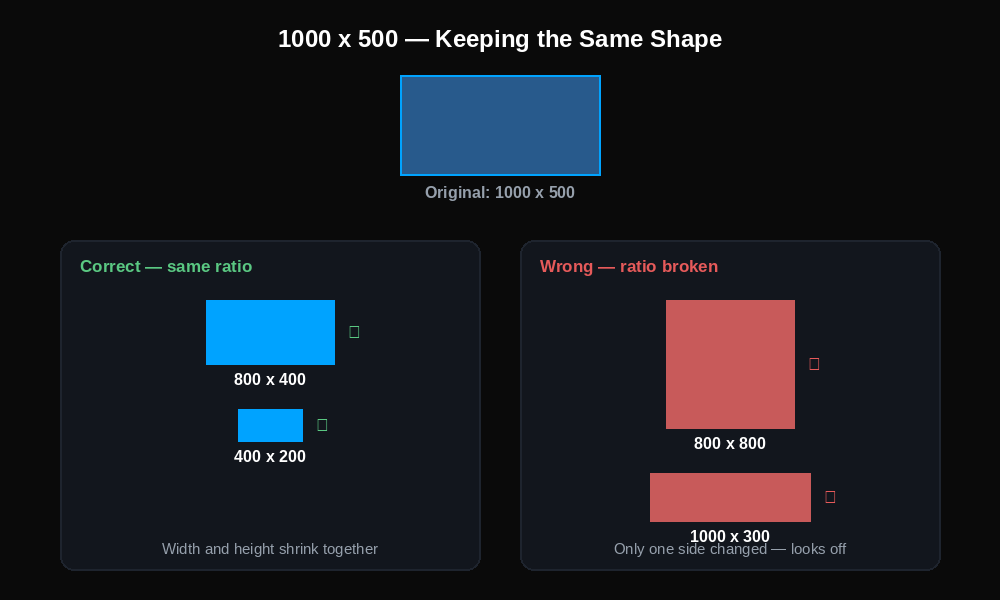
Say your original image is 1000 × 500 pixels — twice as wide as it is tall.
As long as you shrink both numbers by the same amount, it'll always look right:
- ✅ 800 × 400 — still twice as wide as tall
- ✅ 400 × 200 — still twice as wide as tall
But if you only change one side, the image gets stretched or squished:
- ❌ 800 × 800 — now looks squeezed vertically
- ❌ 1000 × 300 — now looks flattened
The simple rule: if you cut the width in half, cut the height in half too. Most resize tools have a lock icon or maintain aspect ratio checkbox that does this math for you automatically — you don't need to calculate it by hand.
Resolution (DPI) is different from dimensions (pixels). DPI (dots per inch) affects print quality, not screen quality. For web and screen use, pixel dimensions are what matter. A 1000×1000px image looks the same on screen whether it's 72 DPI or 300 DPI.
Resizing doesn't change the format. A resized JPG is still a JPG. If you need a different format, convert after resizing.
How to Resize an Image Using DigiToolzHub
Step 1 — Open the tool
Go to DigiToolzHub and navigate to Image Tools → Resize Image.
Step 2 — Upload your image
Click upload and select your image file. Most common formats are supported — JPG, PNG, WebP.
Step 3 — Enter your target dimensions
Choose your resize method:
- By pixel dimensions: Enter the exact width and height in pixels
- By percentage: Scale the image to a percentage of its original size (e.g., 50% makes it half the size)
Make sure "maintain aspect ratio" or "lock proportions" is enabled to avoid distortion.
Step 4 — Resize
Click Resize. Processing is instant for most images.
Step 5 — Download your resized image
Click Download. Your resized image is ready to use.
Common Size Requirements
| Platform / Use | Recommended Size |
|---|---|
| Facebook profile photo | 170×170px |
| Instagram profile photo | 110×110px |
| Twitter/X profile photo | 400×400px |
| LinkedIn profile photo | 400×400px |
| Website hero image | 1920×1080px |
| Email header image | 600px wide |
| Standard thumbnail | 150×150px or 300×300px |
| Product image (most platforms) | 800×800px minimum |
Tips for Best Results
Start with the largest version you have. Always resize from the highest resolution original. Resizing a small image larger produces blurry results — if you need a larger version, find a higher resolution source.
Resize to your actual display size. For website images, resize to the maximum width the image displays at — not larger. Uploading a 4000px wide image that displays at 800px wastes bandwidth and storage.
For social media profile photos: Use a square crop before resizing if your image isn't already square. Most profile photos display as circles or squares — non-square images get cropped automatically, often in unflattering ways.
For print: Use dimensions in inches at 300 DPI rather than pixel dimensions. A 4×6 inch print at 300 DPI requires a 1200×1800px image.
Save a copy at the original size. Don't overwrite your original high-resolution image with the resized version. Keep the original for future use — you may need different dimensions later.
Common Issues and How to Fix Them
The resized image looks blurry — You've scaled the image up beyond its original resolution. Find a higher resolution source image — there's no way to add detail that wasn't in the original.
The image looks stretched or squished — Aspect ratio wasn't maintained during resize. Redo the resize with proportional scaling enabled, or crop the image to the target aspect ratio before resizing.
The file is still too large after resizing — Reducing dimensions reduces file size significantly, but if the file is still too large, also compress the image after resizing. For JPG, reducing the quality setting from 95 to 80 dramatically reduces file size with minimal visible quality difference.
The image dimensions aren't exactly what I need — If you need a very specific dimension that doesn't match your image's aspect ratio — like a 1200×628px social media share image from a square photo — you'll need to crop first, then resize. Resize to match one dimension and crop the other.
Frequently Asked Questions
What is the best image size for a website?+
For full-width images: 1920px wide. For content images within text: 800–1200px wide. For thumbnails: 300–500px. Always compress after resizing for web use.
Can I resize a PNG without losing transparency?+
Yes. DigiToolzHub's image resizer preserves transparency in PNG files. The transparent areas remain transparent after resizing.
Does resizing change the file format?+
No. Resizing a JPG produces a JPG. Resizing a PNG produces a PNG. If you need a different format, convert after resizing.
Can I resize multiple images at once?+
Check DigiToolzHub's resize tool for batch resizing support. Batch resizing saves significant time when processing multiple images to the same dimensions.
What's the difference between resize and crop?+
Resize changes the pixel dimensions of the entire image. Crop removes part of the image — cutting out a portion to change the composition or aspect ratio. Use crop when you want to remove content from the edges; use resize when you want to scale the whole image.
Resize Your Image Now
Ready to resize? DigiToolzHub resizes images instantly in your browser — no software needed, no account required.
Resize Image